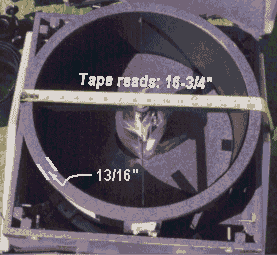
The Upper Tube Assembly
 |
| A couple of shots of the UTA, and its overall dimensions. To join the two circles
together, I used plywood with plate joining "biscuits" and screws. Many ATM's
(and pros) choose to use threaded rod and aluminum tubing for this purpose. But that
approach does not leave very good surfaces to mount your focuser, Telrad and/or finder
scope, not to mention your diagonal spider vanes.
The diagonal spider (as well as the diagonal holder) I used came from the now defunct Optica B/C of Oakland, CA. Modern spiders and holders from such outfits as AstroSystems and ProtoStar are much more sturdy and easier to adjust, but they also "extend" more since their vanes are triangular in shape. This may present a "problem" as to the final dimensions of the packed up scope... Just another reason to make the UTA first; and as small and light as possible. I used Kydex to line the inside of the UTA, but plastic laminate (of any color) would work fine--just paint the inside black.
|
|
|
|
|
| A couple of views of my (recessed) Tectron focuser, but more importantly, my UTA clamp
block system. This method is adapted from Ron Ravneberg's article in Sky and
Telescope, January, 1988. It consists of a "captured wedge"
that is slightly thinner in height to insure the wedge has clamping pressure when the hand
knob (order from Reid Tool Company) is tightened down. There are other methods of
clamping, including ordering ones from Tectron or AstroSystems. The important
thing--within the parameters of this "travel scope," is to add as little as
possible to width and height--space is limited.
|
NEXT Page (The Mirror Box)