Section "C" of: Making a Dobsonian Telescope
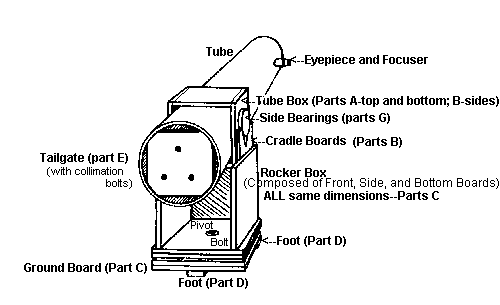
MAKING THE MOUNT
The completed telescope
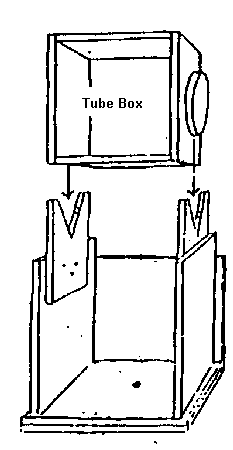
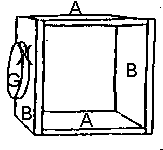
Assembling the Tube Box
1) Glue and nail the Tube Box together as shown. 2) Nail the two Side Bearings (circles) onto the sides of the Tube Box as shown. Side Bearings should be centered. Side bearings do not have to be 6" in diameter, by the way. Many folks use circular plumbing parts, which are much smaller. You may also want to put side bearings on ALL four surfaces--this way, you can rotate your scope 90-degrees for a more comfortable viewing position when desired--especially useful if you have a short (fast focal ratio) tube scope.You might opt to have your circles cut out with a router, by your local, friendly cabinetmaker. While, he/she is at it, ask him to band the edge with plastic laminate ("Formica"); use a screw and a finish washer at the plastic joint. When mounting your side bearings, make sure this screw and washer is mounted at the top when your telescope is pointed at 45 degrees above the horizon ("X"--in the illustration at right)--this insures that they will not interfere with your Teflon bearing surfaces. 3) Slide the telescope tube into the Tube Box. If the tube is too loose in the Tube Box, the fit can be tightened by placing a board or boards (Masonite works well) of the necessary thickness between the tube and the Tube Box. After the telescope is fully assembled and balanced, a screw can be screwed through the tube into the Tube Box from inside the tube to make sure the tube "stays put." |
 |
VERY IMPORTANT NOTE!
Read This Before Assembling The Rocker Box On The Next Page!
u u u
POSITIONING THE SIDE BOARDS
One of the TRICKIEST parts of assembling the Rocker Box is getting the right amount of clearance between the Side Boards. This is how to determine the clearance:
1) Measure the width of the Tube Box—but do NOT include the width of the Side Bearings (circles) in this measurement!
2) The Tube Box needs to fit inside the Rocker Box, with clearance for two Cradle Boards, i.e., Part B (in which the Side Bearings sit): PLUS an extra 1/8" clearance on each side.
FORMULA FOR DETERMINING THE SPACE BETWEEN THE SIDE BOARDS:
Width of Tube Box PLUS width of (2) 3/4" (or 1/2" with a 4.5" scope) Cradle Boards PLUS 1/4" clearance.
Example # 1 (for 4.5" Dob using 1/2" Ply) Tube Box.................................................7-3/4" Square Plus 1/2" each for 2 Cradle boards ..............1" Plus 1/4" clearance (1/8" on each side)...........1/4" Distance between Side Boards =................9"
|
Example # 2 (for 6" Dob using 3/4" Ply) Tube Box.................................................10" Square Plus 3/4" each for 2 Cradle boards ..............1-1/2" Plus 1/4" clearance (1/8" on each side)...........1/4" Distance between Side Boards =................11-3/4"
|
|||
Example #3 (for 8" Dob using 3/4" Ply) Tube Box ..................................... 12" Square Plus 3/4" each for 2 Cradle Boards........... 1-1/2" Plus 1/4" clearance (1/8" each side).............1/4" Distance Between Side Boards =............ 13-3/4" |
Example #4 (for 10" Dob using 3/4" Ply) Tube Box................................... 14" Square Plus 3/4" each for 2 Cradle Boards........ 1-1/2" Plus 1/4" clearance (1/8" each side)..........1/4" Distance Between Side Boards =......... 15-3/4" |
| NOTE: All of the plywood sizes for the Tube Box and Rocker Box of a Dobsonian telescope are determined by the outside diameter of the tube. By using the above formula/arithmetic, you can calculate the sizes of the plywood for any size Dobsonian telescope. |
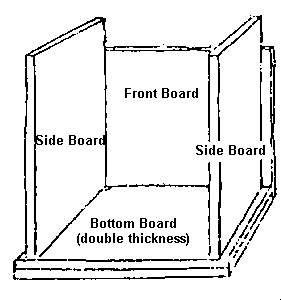
ASSEMBLING THE ROCKER BOX
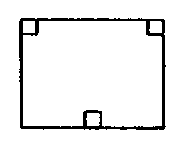
1) Glue and nail two PART C pieces together for the Bottom Board, this will be the base of your soon-to-be Rocker Box. (i. e. make it DOUBLE THICKNESS for added stability and extra "meat" for the lag screw--your pivot bolt--to rotate around). 2) Glue and nail the bottom ends of the Side Boards (Part C) to the top surface of the Bottom Board the correct distance apart (use formula above for correct spacing between Side Boards).Be sure that the front edges of the Side Boards are even with the front edge of the Bottom Board, because we will need an even surface on which to glue and nail the Front Board. (Note: The Side Boards are attached to the top surface of the Bottom Board "long side" up. The Front Board is attached to the front edge of the Bottom Board "short side" up and should cover the front edge of the Bottom Board.) 3) After the Side Boards are glued and nailed, set the Front Board in place to see how far up the front edges the glue needs to go. Then glue and nail the Front Board to the front edge of the Bottom Board. Check to make sure that the spacing between the Side Boards is correct (see above) before nailing the Front Board to them. 4) Glue and nail together the two remaining Part C pieces to make the Ground Board. (As with the Bottom Board, the wood is doubled for added stability and extra "meat" to which our very important lag screw will be affixed to). As I say elsewhere, if you are making a 4.5" or 6" telescope the overall height is going to be short. Instead of the 'normal' Ground Board described here, you might think about using a three-legged stool instead (like the little girl on the front of this website) to elevate your scope and add 'cuteness.' I'd look for one (make sure it's sturdy--no wobbly legs--and with a wood top) at garage sales and local thrift stores. 5) Find and mark the center of the Ground Board. Then turn the Ground Board upside down and glue and nail the three Feet (part D—three pieces) in place as shown (the TWO feet go in FRONT--on one of the longer edges, that is): |
The Rocker Box |
Front edge of Ground Board (upside down, "plan view")--one foot at each corner:
Back edge of Ground Board with foot centered
|
 The Ground Board (double thickness) |
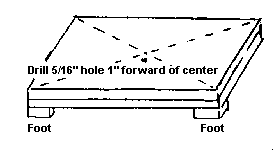
| 6) Now turn the Ground Board
right-side-up. Make a mark one inch forward (toward the TWO front feet) of the center. (Do
NOT let this 1" forward confuse you; this is just an approximation
of the center of the triangle the three feet make. The three sides of this triangle
are not equal--the front side of the triangle--the one with a foot in
each corner is shorter than the other two sides pointing back to the other foot. A more accurate way to
determine this center is to find the midpoint of each side of the triangle and draw a line
at a right angle to each side toward the center; the intersection of the three lines is
the true center of the triangle formed by the feet.) Drill a hole on this mark
for the lag screw. This hole should be three sixteenths of an inch smaller in diameter
than the lag screw (5/16") to insure a tight, threaded fit. Be careful to drill
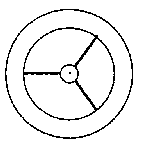
this hole as square as possible (have a friend "sight" for you as you drill). 7) Turn the Rocker Box upside down. Place the Ground Board (which you just drilled a 5/16" hole near the center of) on top of the upside down Rocker Box. Orient so all sides are flush (even) with each other.(Actually, the Front Board will "hang over" the Ground Board 3/4"--"split the difference," if you like). Using your 5/16" drill bit and the Ground Board as a template, drill through the bottom of the Rocker Box (the Bottom Board). Now use a 1/2" drill bit to make this hole (the one in the Rocker Box ONLY) larger--1/2" is the diameter of your lag screw/pivot bolt. Always drill as square as possible--you might have a friend "sight" for you as you drill. Leave the Ground Board's hole at 5/16"! Note: The hole in the LP record will not be big enough for the lag screw to fit through, so you will have to enlarge it with the drill--might as well do it now while you have the 1/2" drill bit in the drill!. Use the same bit you used to drill the hole in the Rocker Box, i. e., the same size as the diameter of the lag screw (1/2"). (CAUTION: Have someone hold down the record for you while you drill it or it will madly ride up on the bit). Note: A 12" diameter LP will have to be trimmed to a smaller diameter (~9-3/4") for a 4.5" Dob, for the larger size Dobs, a 12" LP will be fine. 8) On the Ground Board (which should be right side up, i. e. with the feet on the ground), nail or screw three squares of Teflon in a circle at three angles of an equilateral triangle about half way between the "center" hole and the feet. (The phonograph record will ride on these Teflon squares, so check to make sure the squares don’t extend past the edge of the record).
Use finish nails (small heads) to nail the Teflon onto the Ground Board, and use a nail set to inset the nail heads. If you opt to attach the Teflon with screws, use only flat-headed wood screws and countersink the screws so the screw head is "buried" beneath the top surface of the Teflon. (The record must ride smoothly on the Teflon and not be scraped by the nail or screw heads). 9) Now we are ready to assemble the Rocker Box, LP (or Plastic Laminate), and Ground Board in a sandwich like manner: Place the record (or Plastic Laminate) over the Ground Board and the Rocker Box over the record on the Ground Board, so that all the holes are lined up. Insert the lag screw (with its washer) and screw it in. (Be vigilant as you do this to make sure that the lag screw goes in straight, not at an angle). Tighten the screw until it is snug and then back off a bit--an 1/8 of a turn, let's say. The Rocker Box should swivel smoothly on the Ground Board. Voila: Our azimuth motion! |
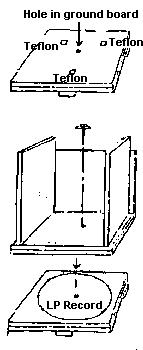 Teflon squares are underneath the record or Plastic Laminate (see note at left) |
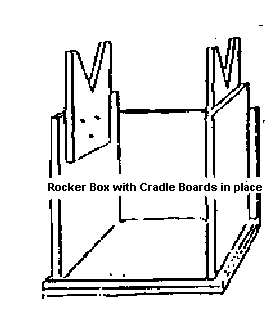
10) Now we are ready to balance the telescope and attach the Cradle Boards (Part B).
Cutting the Cradle Boards And Balancing The Tube
CUTTING THE CRADLE BOARDS
1) Use the two remaining pieces of Part B for the Cradle Boards.
2) The Cradle Boards need to be cut to hold the Side Bearings (circles). (Note: Cutting a V-shape is the simplest way to cut the Cradle Boards and is very satisfactory, but some people prefer to cut a semicircle for aesthetic reasons. (The V-shape can be easily cut with a handsaw.)
3) To cut the V-shape, find and mark the center of one of the boards (Part B). The angle of the "V" should be about 60 degrees. Note: Lay your Side Bearings and Teflon onto the surface of your Cradle Boards to insure you cut away enough material so that your Side Bearings nestle nicely into the Cradle Boards. Use a protractor to mark the "V" and cut it out with a hand saw (see below). Do both Cradle Boards the same way.
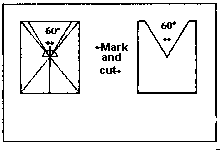
Cradle Boards (Part B)
BALANCING THE TUBE
1) To balance the tube we will need to install the primary mirror, the spider with the diagonal mirror in the telescope tube, an eyepiece, as well as any 1X finder or normal finder that you plan on using with your telescope. Remember: HANDLE MIRRORS WITH CAUTION!!!
2) Slide the telescope tube into the Tube Box. The fit of the tube should be snug in the Tube Box. If the fit is much too loose, a piece of masonite or thin plywood, or shim shingles (the kind you used for the spider) may be glued inside the Tube Box to tighten the fit as needed.
3) Slide the Tube Box along the tube to the spot where the weight of the telescope is balanced at the middle of the Tube Box. Use a broom stick handle to aid you in finding this balance point. Knowing this "balance point" will aid you in determining where (how high) to attach your Cradle Boards.
ATTACHING THE CRADLE BOARDS
1) The telescope’s Side Bearings (the circles on the Tube Box) sit in the V-shaped notches in the Cradle Boards, allowing the telescope to be moved up and down easily. Position the Cradle Boards so that there will be at least 1" clearance between the lower end of the telescope tube (i. e. the tailgate end) and the Bottom Board of the Rocker Box when the telescope is sitting vertically in the Cradle Boards. The telescope must also be able to move forward into a nearly horizontal position without interference by the Front Board. 2) The Cradle Boards, when properly positioned, may be nailed or screwed to the Side Boards as shown, slightly forward of center (in line with the bottom pivot bolt below). The Cradle Boards must be far enough back from the Front Board to allow the telescope to stand straight up in the rocker. Note: Since the Cradle Boards may have to be moved around a few times to get the placement just right, it is a good idea to "tack" them in place with just a couple of nails while you are making adjustments. Glue and nail--or screw--them firmly in place later. Another note: Cradle Boards are not found on any commercial "Dobs," and few homemade ones, anymore. Most just incorporate these "altitude bearing holders" into the Side Boards. The advantage of Cradle Boards (other than being simple to design and manufacture) is that they stiffen up the side boards a bit, as well as widen the "footprint" of our base ("Ground Board"); thereby adding stability and rigidity: This is a good thing. [We will henceforth refer to the Tube Box-and-tube assembly (with mirrors installed) as the "telescope." The mount in which the telescope sits will be referred to as the "rocker"]. 3) To enable the telescope to move smoothly in the up-and-down direction, we nail small pieces of Teflon at the points where the Side Bearings contact the Cradle Boards. Place the telescope in the rocker. Make a mark on the wood of each of the V-shaped notches at the two points where the Side Bearings make contact. 4) Nail a small piece of Teflon at each of the four marked contact spots (two on each side). Let the Teflon protrude a little over the inside edge of the Cradle Boards to keep the Tube box away from the Cradle Boards. Use finish nails and set the nails with a nail set. Place the telescope back in the rocker. The Side Bearings should glide smoothly on the Teflon. |
|
ALIGNING THE DIAGONAL
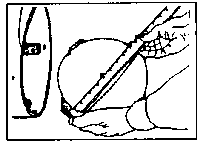 |
As mentioned earlier, a small sticker or decal should be placed at the exact center of your primary mirror. Visit your local stationary store--I like to use a "hole reinforcement" or a "gold star." This sticker is used to help in the alignment of both the objective and the diagonal. Don't worry: this does not harm your telescope in any way--this sticker is well inside the shadow your diagonal mirror casts. |
1) Set up the telescope (i. e. place the telescope with the spider and objective installed, in the rocker).
2) Adjust the spider in the tube in such a way that you can see the entire objective mirror reflected in the diagonal mirror. You should be able to see the ENTIRE OBJECTIVE MIRROR, not just a part of it. Be sure your eye is centered over your eyepiece tube.
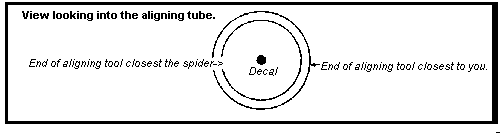
3) Place a piece of metal tubing (about 6" long—the same width as the piece in which your eyepiece is nestled) inside the cardboard eyepiece tube, so that it protrudes out several inches. Now think of the two ends of this metal tube as CIRCLES.
4) When you look down the metal tube, the CIRCLES (i. e. the two ends of the tube) SHOULD APPEAR CONCENTRIC, AND THE DECAL ON THE MIRROR SHOULD BE EXACTLY IN THE CENTER OF THESE CONCENTRIC CIRCLES. You will see the three legs (shingles) of the spider reflected in the objective, but for now, ignore them.
The way to get the alignment perfect is by fiddling with the position of the spider in the tube. When you have it just right, you can glue the spider in place. Apply a line of glue on either side of each shingle where it contacts the tube--100% black silicone glue works well here.
(Note: Before installing the spider you may wish to screw a small eye-hook dead-center into the 90 degree cut end of the wood block that supports the diagonal. After the spider is installed, another eye-hook may be screwed into the telescope tube, and a string may be tied between the two eye-hooks. This will protect the objective mirror if the spider is accidentally knocked out).
ALIGNING THE OBJECTIVE
Remember: Do this indoors or in the shade!
We have come now to the final step: aligning the objective mirror.
(We won’t need the aligning tube anymore).
To align the objective mirror, we turn the tailgate bolts till the reflection of the eye moves under the decal.
NOTE: If the alignment must be done in the dark, you may have to shine a light on your mirror face in order to see the reflection of your eye in the objective.
Through the eyepiece hole, it should look something like this:
Keep the mirror pulled back against the tailgate during alignment.
Note: If you have a friend turn the bolts, you can watch which way the mirror moves--it is more difficult if you are doing it by yourself. Call the bolts "yours," "mine," and "ours": representing the furthest bolt from you; the nearest bolt; and the middle bolt (top) one, respectively. ;-)
Go use your scope! ...After you know everything works well, you can paint and finish to your desire!
A Few Finishing Tips:
Eighty-percent of a good finish is preparation. Fill any glaring holes or gaps in your plywood mount with putty or spackle (the latter only if you plan to paint it an opaque color). Take the extra time to sand your mount, especially "breaking the edges"--rounding them, if you will; so that no loose splinters come to harm anyone. If you plan to stain your mount, first experiment on a piece of scrap plywood--not all woods (birch and fir, come to mind), take stain well. Use a weatherproof paint; or varnish, or polyurethane as a final coat over stain. Be sure to seal any raw edges, including the cardboard tube, which is particularly sensitive to moisture.
Some folks use sticky-backed shelf paper to wrap their telescope tubes in. I use Monocoat or Ultracoat, found at your local hobby store: it is used to wrap model wooden airplane wings and fuselages. It is a little pricey; but it "shrink wraps" with the aid of an iron into a beautiful, glossy, weatherproof finish for your tube. Comes in lots of colors, too!
Sight down an edge of your Tube Box; that's how you aim the thing! (Of course, to make aiming a little more convenient and fun, you can add a 1-power aiming device like a Telrad or Rigel Systems QuikFinder, or even a finder scope.)
Care Instructions:
Do not store your scope outside. If you don't have a large closet or garage, put a lampshade on your scope and store it in your living room!
Remember: Door jambs destroy homemade focusers!
Cover your scope when not in use--dust and moisture--are the enemies! Plastic garbage bags, at both ends, work fine.
Despite your best efforts; your mirror will accumulate dust, and will require cleaning from time to time... Remember: this is a "first surface" mirror--a very fine deposit of aluminum is deposited on the surface--you do NOT want to introduce any "micro scratches" here! You can remove most of the dust with a rubber air blower (found at your local pharmacy store). Once or twice (at most) a year you should wash your primary. Here's how I do it:
First, you will need:
1) A suitable, clean tub.
2) A drop or two of mild (ivory) dishwashing soap.
3) A box of sterile cotton balls.
4) A gallon (or less) of distilled water.
1) Wash your sink, Rubbermaid tub, whatever, thoroughly.
2) Fill sink, whatever, with room temperature tap water (to avoid thermal shock between the layer of aluminum and the glass--this could help loosen the adhesion between the two surfaces--use only room temperature water throughout these steps); add one or two drops (ONLY) of dishwashing soap.
3) Submerse mirror in water. Swish around. Let soak.
4) Replace soapy water with fresh soapy water. Do not hold mirror under a running tap--some people do; I don't recommend it (localizing the "thermal shock" possibility, plus the danger of overdoing it with too much pressure).
5) With STERILE cotton balls wipe your mirror--from the center out--while mirror is still submersed. Be liberal in your use of the cotton balls (change frequently). Roll the cotton while swiping. Do not apply much pressure.
6) Replace soapy water with room temperature tap water to rinse away any soap.
7) With bottled, distilled water, rinse your mirror for a final time. (This removes any harmful salts that might be in your tap water). This is an important step--do not forget it!
8) Set mirror on edge to dry. Check on it in twenty minutes, or so. Any residual water droplets (usually just one or two) can be soaked up with any cotton balls you have left.
Back to: Homepage, Table of Contents
To: The San Francisco Sidewalk Astronomers
E-mail: Ray Cash