Section"A" of Making a Dobsonian Telescope

(Preparing the Tube; Making the "Spider" and Eyepiece Holder-Focuser)


PREPARING THE TUBE

The diameter of the telescope tube should be about 2" larger in diameter than the diameter of the objective mirror

.

The plastic liner may be carefully peeled out of the inside of the tube.Slow, careful peeling helps keep the liner in one piece and makes it easier to remove.

Some tubes are waxed outside. If you plan to paint the outside of the tube, a light sanding will remove some of the wax and make painting easier.

The inside of the tube may be painted black. Tape your paint brush on a broomstick handle if your tube is longer than your arm reach.


MAKING THE SECONDARY MIRROR MOUNT ("SPIDER")

Dowel (closet pole, or handrail stock) with one end cut at a 45 degree angle. Three grooves should be cut (with a thin blade) at equal (120 degree) intervals (about 1/4" deep) as shown.

Note: How does one cut a cylinder at 45 degrees? Cut a strip of paper long enough to wrap around your "closet pole." cut both ends (of the paper strip) at 45 degrees so that you make a trapezoidal shape... wrap this piece of paper around the dowel so that the ends come together (trail and error cutting may be required here). The paper will not lay flat! Now trace the outline the edge of the paper makes. Cut close with a hand saw. Sand or file to line.

We will need three pieces of cedar shingle, each about 1 1/4" wide.

Marking the thin ends of the shingles where they fit snugly into the grooves in the dowel.

If the shingles are cut slightly concave (so they won’t rock back and forth in the dowel and will fit snugly) they won’t have to be glued in. Replacement will then be easy. If you do decide to glue them in, use black, 100% silicone adhesive.

Shoving a shingle into the groove in the dowel.

Doing the same with the other two shingles.

The compass should be set to the radius of the inside of the telescope tube.

Placing the point of the compass at the center of the dowel, mark all three shingles.

Sawing off the ends of the shingles at the marks.

Beveling the corners so the shingles won’t split when the position of the spider is adjusted in the tube.


All corners beveled...

We may paint the spider black, or simply blacken the surfaces facing the eyepiece tube.

The slant-cut end should be left unpainted (to accept glue). If spray paint is used, be sure to cover the slant-cut end with masking tape while spraying

Cutting leather scrap. We will need three pieces about 1/2" square.

The secondary mirror (flat front-surface mirror). This mirror is also called a "diagonal." (Secondary mirrors are usually elliptical in shape; not rectangular like the one above).

Applying glue at three points on the slant cut end of the dowel. (If masking tape was used, remove it first!). Leather pieces should be glued directly to the wood. An alternative to leather and white glue is to use three dabs of 100% silicone adhesive--you might want to drill three small, shallow holes in the "slant cut" to accept the silicone better.


COMPLETING THE SPIDER

Leather pieces should be spaced evenly between the grooves. Be sure the leather gets good and wet with the glue.

After the leather pads are glued to the dowel, we apply glue to the tops of the leather pads...

.

...and glue the mirror onto the pads.

Make sure the mirror is evenly centered over the dowel.

The mirror should be kept level while the glue dries.

Propping up the spider while the glue sets.


MAKING AND INSTALLING THE EYEPIECE TUBE

adapter.gif (21056 bytes)

NOTE: Above, a close-up photo of my Dobsonian Sun scope: An inexpensive alternative to constructing an eyepiece tube from a cardboard tube and masonite (below) is to order--and attach--a 2-inch to 1-1/4-inch adapter from a telescope mail order house like Lumicon, Orion, or Scope City. This $20 item is used in expensive, low-profile focusers to adapt from eyepieces with a 2" barrel to ones with the more common 1-1/4".  You will have to drill a couple of holes through the metal (usually aluminum) to accept the small through bolts, and shim the flat bottom equally in two places (since you are attaching the thing to a cylindrical surface)... It adds a little more weight "up top," requires two hands to focus (one to operate the knurled stop screw, and one to push-pull focus); but you will end up with a sturdier, low-profile focuser than the one described below. Be sure to drill only an 1-1/4" hole in the tube, instead of the 1-1/2" hole as per the instructions below.


Gluing the cardboard eyepiece to a 3" x 4" piece of Masonite with a 1 1/2" hole cut in its center. Make sure to get the cardboard wet with the glue.

Beveling the inner edge of the tube with a pen knife so that the brass will fit in easily.

The brass tube should fit snugly inside the cardboard tube...

...and slide back and forth fairly easily.


If the fit is too tight, we may peel out a thin layer of the cardboard on the inside of the eyepiece tube.


eyep.gif (13318 bytes)

If the fit is too loose, we may glue in a strip of cardboard lengthwise down the inside of the eyepiece tube and let the end of the strip hang down over the end of the tube. (The strip should be glued down over the lip of the tube.)


Gary Morris (glmorris@jps.net) came up with an elegant solution to attain the correct amount of "focusing friction": He simply uses a hose clamp (see photo at left)... He writes that it is a onetime affair to tighten the hose clamp around the cardboard focusing tube just enough to provide the necessary friction around the sink drain tube. (This would replace the need to "peel" or "glue in a strip of cardboard" in the two previous steps)

Running a thin bead of glue (100% silicone glue works well here) around the cardboard tube where it meets the Masonite.

Finding the location for the eyepiece hole. See note—below:

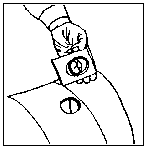
Note: Cut the telescope tube the same length as the focal length of your mirror. Then cut the eyepiece hole back from the front end of the telescope tube by the radius of the tube. That is, for a 10" diameter tube, cut the eyepiece hole 5" from the front end; for a 12" diameter tube, cut the eyepiece hole 6" from the front end. These distances are for mirrors about 1" thick. If you have a thick mirror (i. e. 2"+) the hole should be moved up toward the front end of the tube an extra 1" to compensate. (i. e., a 12" tube with a 2" thick mirror would put the hole 5" from the front end; a 10" tube with a 2" thick mirror would put the hole 4" from the front end.

A more important Note: Now, the above note ONLY works if you make the homemade focuser AND follow all the details of tailgate construction, use Sonotube, etc in these plans.  If you don't, you will have to do some simple arithmetic. Folks: it is extremely easy to drill your focuser hole in the wrong place! Please read the following email and my response:

> I just built a Dob with an 8" f/6 primary mirror, 48" length tube and
> centered the focuser 5" from the end of the tube. I can see the moon really
> clearly, but when I look at distant stars, I can see their light, but in the
> eyepiece, I can only see the primary mirror--the star doesn't come into
> focus. I have a Crayford R&P focuser and a zoom eyepiece (7-20MM).

Hi Daj,

This is a most common problem. I must rewrite that section on the plans!

You did what the plans told you to do; however, you used a commercial focuser, which does not have as much "in travel" as the homemade one in the plans. You need to re-position your diagonal closer to the main mirror and re-drill your focuser hole.

Here's how to figure out where EXACTLY:

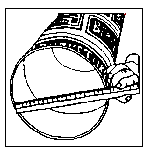
Number One: Find out the exact focal length of your primary mirror (even if it is supposed to be 48"--for example--this may vary by an inch or more in either direction). To do 
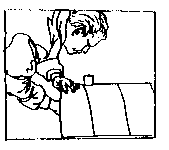
this, the safest way is to bring your primary indoors, prop it up at the end of the hall, and then, with a piece of paper and a flashlight, start at about TWICE the distance of the (supposed) focal length, shine the flashlight at the primary and look for a formed image on the piece of paper (that you are holding in your other hand). IMPORTANT: The flashlight filament and piece of paper MUST be in the same plane, facing the mirror. Focus the image on the filament. Mark your floor with a piece of tape, or something. Measure carefully the distance from the face of your mirror to your mark. DIVIDE BY TWO. This is the focal length of your mirror. Write it down!

flength.gif (4168 bytes)

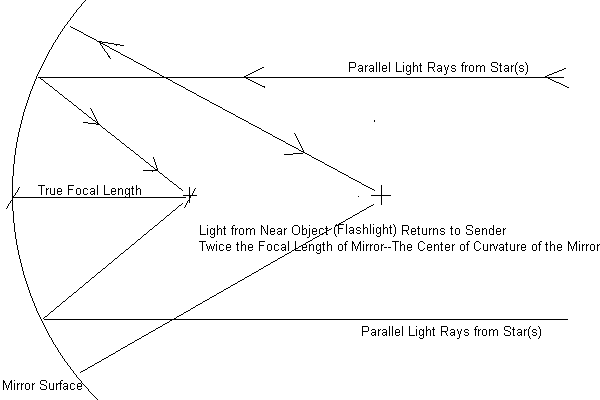
You can, of course, double check this dimension (the True Focal Length), outside at night, using the Moon or bright Jupiter as a target--don't forget to bring a friend and a tape measure to help you! And catch the image of Jupiter or the Moon bouncing back in the same direction!


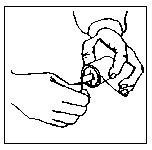
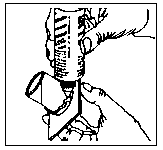
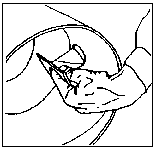
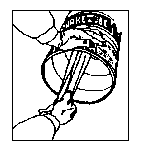
Now, your telescope, when set up properly, will have a celestial image formed at the field stop of your eyepiece(s). Look at your eyepiece(s). Specifically, look down the "wrong end," the open end. Usually you can find a small black ring encircling the inside of your eyepiece, usually this ring corresponds to where the chrome barrel ends on the outside of the eyepiece, and where the eyepiece bottoms out when inserting 
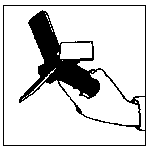
into focuser. Find it? Now, look into your eyepiece (normally now, through the right end) and place a pinky finger in the wrong end at the field stop. See how your finger is magnified? Understand the dynamics of the telescope-to-eyepiece relationship better now? I am not familiar with zoom eyepieces; do determine where the field stop is--or its average place in relation to the outside of the eyepiece is, though. What I am trying to say is: the field stop generally corresponds to where the eyepiece bottoms out in the focuser, but maybe not in the case of a zoom eyepiece.


diagram.gif (2269 bytes)

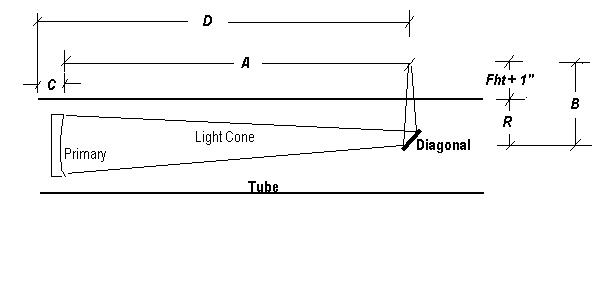
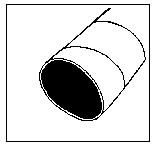
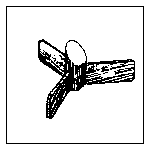
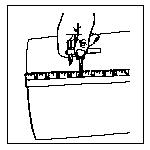
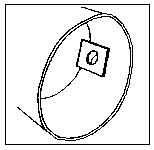
Refer to the above diagram, fill in your own values, if you will:


A + B = your true focal length

C = back of telescope tube to face of mirror

D = back of telescope tube to center of focuser hole

R = radius of tube

Fht + 1" = your focuser height (fully racked in) plus one inch.

(A and/or D is what we are going to determine).


Okay: it is just simple arithmetic to determine where to drill your focuser hole and place your diagonal directly below it:

Fht + 1": 
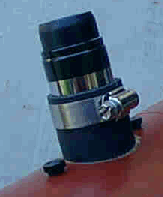
Let's say you have a commercial focuser, which, when racked all the way in is 1-5/8" high (sitting 1-5/8" above the tube). First of all, you do not want your focuser racked all the way in; you need some "play"; not all eyes focus the same; not all eyepieces focus the same. Add one inch to this minimalist equation (2-5/8", in other words). You want the telescopic image to hover 2-5/8" above your tube, in other words, before being magnified by an eyepiece.

You know all the other factors: The TRUE focal length of your mirror, where the mirror face is sitting in relation to the back of your tube, and the radius of your tube.

So, as an example, let's say the true focal length of your mirror is 48".

And your mirror face is sitting 2" from the back of your tube (assuming you have 3/4" plywood tailgate + 1/4" masonite collimation pads + a 1" thick mirror = 2" )

And the radius of your tube is 5".

So: add 5" + 2-5/8" = 7-5/8"

Subtract 7-5/8" from 48" = 40-3/8" This will be the distance from the face of your mirror to your focuser hole, and the diagonal.

If you add the 2" (the face of mirror to back of tube dimension), you can measure from the back of the tube 42-3/8"

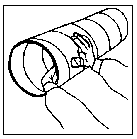
I drilled my focuser hole in the wrong place on my first homebuilt telescope; it is simple enough to fix. Did you save the piece you drilled out? Good. you can use "Bondo" (automotive body filler) to patch it back in--use masking tape to hold it in until the Bondo sets up (about ten minutes). Simply rotate your tube and redrill hole--of course you will have to reposition your diagonal, too. Another way to fix this: Move your mirror cell up or down in the Sonotube--of course, this will be easier if you keep your tube longer than (you think) necessary to begin with.

The distance we have measured is for the center of the hole. We may cut the hole to the outside diameter of the cardboard eyepiece tube.

If a hole-cutter is unavailable, a mat knife may be used.

We may peel off layers of cardboard as we gradually cut through the tube.

Mission accomplished! Hint: Save this piece, just in case you made a boo-boo here! It will be much easier to patch up, if necessary, with this piece still around!

We are ready to install the eyepiece tube.

The cardboard eyepiece tube should fit snugly through the hole. If it is too tight, file or pare the hole a little bigger.

Eyepiece tube in place.

View from the outside of the telescope tube.

If we have not already painted the inside of the telescope tube, we now need to paint at least the section visible through the eyepiece tube black .

Two sheet metal screws (one on either side of the eyepiece tube) may be used to draw the Masonite rectangle snugly up against the inside of the telescope tube wall.

Fitting the eyepiece inside the brass tube. You can purchase an eyepiece, or salvage the eyepieces out of an old pair of binoculars.

If the eyepiece is too small to fit snugly in the brass tube, wrap it in a layer of two of corrugated cardboard.

Adjust the amount of cardboard as needed so that the fit of the eyepiece in the brass tube is snug.

The eyepiece is ready for use!

Please Note: It is very easy to whack your eyepiece holder as you move your telescope tube around: Be especially mindful of doorjambs and car loading/unloading!


INSTALLATION & ADJUSTMENT OF THE SPIDER

Trying out the fit of the spider in the telescope tube.

Adjust the spider so that the diagonal mirror is in front of the eyepiece hole. (The diagonal mirror should be facing the hole).

When we look through the eyepiece hole we should be able to see the reflection of the (open) bottom end of the telescope tube in the diagonal mirror.

If the fit of the spider is too loose, we may tighten the fit with cardboard folded to the necessary thickness...

Fitting cardboard under one shingle (the shingle opposite the eyepiece hole). Readjust the spider as needed after fitting the cardboard.

When installed, the whole objective mirror will need to be visible in the diagonal when we look into the eyepiece hole. Do not glue the spider to the tube until final adjustments are made on the alignment.


Onwards to: Section "B" (Tailgate; mirror cell construction)

Back to: Homepage, Table of Contents

E-mail: Ray Cash